
Scaffolding the online task: step by step

One of the joys of the digital age is allowing children to work on the computer, playing games and doing web quests to further their language development. Computer games allow children to work at their own level, and computers never tire of the endless repetition of drilling certain grammar patterns, something I cannot say of myself. We often boast about how children are “so much more at home” with computer usage and how they just “pick it up so easily”. Just as often, however, we teachers are faced with children who do not just “pick it up” and need step-by-step instruction on how to use a certain computer game or navigate a web quest successfully. In our well-filled classrooms and even better-filled time, it would seem quite impossible to give these children the guidance they need.
During a course I once followed in order to become a Dalton-certified teacher, I learned about a wonderful solution to this conundrum: the how-to sheet. A how-to sheet is, simply put, a means of scaffolding children’s work. It provides a step-by-step guide of how to complete a task, complete with simple instructions and illustrations. The goal of using these how-to sheets is to allow children to work independently on multi-step tasks or games with a minimum of extra effort from the teacher.
The first few sheets took the most time, as I figured out what format was the most useful, and what illustrations the most helpful. Eventually, I started making how-to sheets for all sorts of things, from computer games to language tasks, so that children could work independently on a range of activities during the lessons. The first couple of times, the children needed some instruction: how did these how-to sheets work? Once they figured that part out, they happily worked on their own, and all I had to do was make sure they did their work well and give them feedback once in a while.
The initial work of making these guides paid off: children could work independently, and my hands were kept free for the work of interacting with the children through the new language.
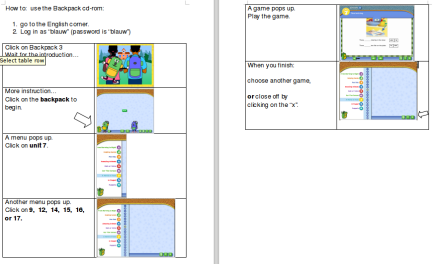
Here is a step-by-step instruction on how to make one of these sheets:
- Look at the activity through the eyes of the child. What is his starting point? That is step 1.
- Go through each step of the activity. Every time the screen changes, or every new step in the game, take a picture or make a screen shot. Crop the picture as needed.
- Number the steps, and give a short explanation for each one. Use language the children can easily understand.
- Insert the pictures next to the directions. I have found that using a table is an easy way to accomplish this. Anchor the picture as a character, and it will stay in the table where you put it.
- Where needed, add an arrow to point out exactly where the child needs to click. Or, insert thought and speech bubbles to illustrate thinking or speaking.
- Show children how the step-by-step plan works, so they can refer to it themselves, and refer back to it should they have questions.
Scaffolding towards independence takes on many forms, and this is only one of them.
But for now, the summer holiday calls, and so I shall take a short time off before resuming this blog. Happy summer holidays, everyone!
Flow charts: visualizing the 20 questions game
 “Does it have legs?” a child asked. The child in front of the class answered quickly, “yes, it does.”
“Can it fly?” another asked. “No, it can’t,” was the answer.
It took a little while and a number of yes/no questions, but soon the class knew the animal’s secret identity: a giraffe.
This guessing game is a favorite among many ESL teachers, including myself. The question I found myself asking was how to make it more challenging for the older learners. Also, how could I change the format of this game so that every learner could participate, even the shy ones?
It took a little searching, but I soon had a viable answer: flow charts. In essence, a flow chart works just like the verbal version of the guessing game, but visualizes the process of elimination involved.
There are different ways a flow chart can be used in the lesson.

For younger learners, one can make up a poster-sized chart with pictograms on the question blocks and pictures of the vocabulary being sorted out.
For middle learners, one can make a flow chart with simple questions.
The older learners can make up their own flow charts to try out on classmates.

Flow charts allow children to visually sort information along the lines of simple questions. The example provided here is about a few animals, but with a bit of creativity, one can help children make their own flow charts about any number of topics one teaches about, for instance modes of transportation, clothing, food, weather, hobbies, and jobs. By having children sort the information in this fashion, they are also activating their logical-mathematical intelligence, broadening their learning.
Flow charts can also be used to assess a learner’s understanding of the concepts taught. Can he or she ask questions effectively to find out what the secret word is? Can he or she formulate the questions correctly? Can he or she create a flow chart that includes all of the concepts learned during the last few lessons? These are just a few possibilities that come to mind when connecting flow charts to assessment of our learners.
The examples provided here are, of course, rather straightforward and very simple. I suppose children in high school or adult ESL learners could make more intricate examples, for example to describe their day or how they prepare a meal. I wonder if others use flow charts in their ESL classrooms? If so, how? I’d like to hear your ideas.
Van Gogh in the ESL classroom

What do you see in this picture? Tell me about it. What words do you know? What phrases do you need, to describe what you see in this picture? What colors do you see? How would you describe this painting? Vibrant? Muted? Rough strokes? Refined brushwork? Who made this painting? When? Where?
Look at the painting below. What do you see there? What’s the weather like? Who do you think lives there? And again, who made this painting? When, and where?

During lessons, it’s really important that we expose children to various modes of communication, such as music and games, but also the arts. Paintings, sculptures, and drawings are all excellent means of developing vocabulary and eliciting speech. It also frees us, as teachers, up from having to use what the textbook dictates. Art is everywhere, and we can learn to talk about it, at any age.
For instance, young people can start by naming the colors and objects they see, or alternatively, point to things the teacher or other children name. More advanced learners can talk about whether or not they like a certain piece of art, and more importantly, why they may or may not like it. Young adults can dive into the more technical aspects of the artwork, discussing the artist, the type of art created, and maybe even the context which may have inspired the particular artwork.
An example of the history behind the painting is hidden behind the row houses in the painting above. Who would have known that these five houses were once owned by Alfred Pope, a former slave who had once tried escaping, was caught, to be freed upon his master’s death two years later?
Art isn’t just for talking about, however. It can be a source of inspiration for teachers and children alike, providing a means of working outside the textbook-driven box. In an informative blog written by the British Council, several ideas for how to use art in the ESL classroom are explained. Besides talking about art, children can make their own artwork to talk about. In a blog written by the Oxford University Press, two more ideas are shared, expanding the idea of “art” to include doodles and poetry.
Another important reason for using a different mode of teaching is that different children are stimulated to participate in the lesson. Oftentimes, the quiet learners will come out of their protective shells of silence to join in an arts and crafts activity, into a space that allows them to express themselves in ways outside of words. It’s then on us, as teachers, to help them connect their work to the words and phrases they can use to talk about it.
I’ve often used pictures from the internet for use in my classes, putting them into power points as a means of getting children to look at the world in a different way. Here are a few tips for finding usable images:
- Search terms: look on Google images for: painting + topic, for instance “painting + tiger”. Sometimes I’ll use “watercolor” or “oil painting” if I’m looking for a certain kind of effect. Other times, I’ll use “statue” or “abstract painting”.
- Search settings: It’s important to choose the search settings carefully, by clicking on “search tools” and then “size”. I’ve found that small images won’t reproduce well in a power point, so I often pick the “large” setting when looking for images I want to use.
- Copyright settings: sometimes pictures have “watermarks” on them. If you change your search setting on “usage rights” to any other setting than the default, you won’t have any watermarked images.
I wonder who else has used art in the English lesson? Please let me know about your own experiences.
Putting the hocus pocus into CLIL

“Abracadabra, hocus pocus, you will all form a quiet line!” I wave my wand, close my eyes, and count back from five to one. Then, I cautiously peek with one eye, then both eyes open in wonder as I look at the giggliest quiet line I have seen all day. The children realize, of course, that they are as much of the magic as the wand I waved, and we make our way down the hallway to their classroom in silence.
Magic is a very real part of young children’s reality. How often have I used that magic wand in my own ESL lessons? I cannot even count the ways. At a certain point, however, the children realize that the magic isn’t as real as it used to be. Santa Claus becomes a person in a costume, and the tooth fairy is really Mom or Dad. Does that mean that magic should leave the classroom?
Not in my opinion. At that moment, I change the aspect of magic from something they experience, to something they can do. In this case, I combine magic with maths and English in a card trick any 6-year-old can do, and it’s called “What’s my magic number?” Here’s how it works:
Easy version:
- Remove all Kings, Queens, and Jacks from the deck. Now, only the numbers are left (Aces count for ones).
- Shuffle the deck.
- A helper takes a single card from the deck and keeps it to himself (secretly!).
- Lay out the cards, one at a time. When you find two cards that make sums of ten, for instance, 9 and 1, or 8 and 2, cover these with new cards.
- When all of the cards have been laid out, pick up matching piles. “Matching piles” are piles in which the top cards make sums of ten.
- The remaining pile will be the “match” for the secret card. For instance, if the helper has a 4, then the last pile will be topped with a 6. If no piles are left, then the missing card is a 10.
Harder version:
- Shuffle the deck.
- A helper takes a single card from the deck and keeps it to himself (secretly!).
- Lay out the cards, one at a time. When you find two cards that make sums of ten, for instance, 9 and 1, or 8 and 2, cover these with new cards. A set of King/Queen/Jack counts as a complete set, so cover these a set at a time.
- When all of the cards have been laid out, pick up matching piles. “Matching piles” are piles in which the top cards make sums of ten.
- The remaining pile will be the “match” for the secret card. For instance, if the helper has a 4, then the last pile will be topped with a 6. If no piles are left, then the missing card is a 10. If two face cards are left, then the missing face card is the missing card. For instance, if you have only a Jack and a Queen left over, then the missing card is a King.
Challenge version (for instance, magic number is 13):
- Note: A Jack counts for 11, a Queen for 12, and a King for 13. Numbers count for their own value.
- Shuffle the deck.
- A helper takes a single card from the deck and keeps it to himself (secretly!).
- Lay out the cards, one at a time. When you find two cards that make sums of thirteen, for instance, Queen and 1, or Jack and 2, cover these with new cards. A King, being “thirteen”, can be covered whenever it shows up.
- When all of the cards have been laid out, pick up matching piles. “Matching piles” are piles in which the top cards make sums of thirteen.
- The remaining pile will be the “match” for the secret card. For instance, if the helper has a 4, then the last pile will be topped with a 9. If no piles are left, then the missing card is a King.
There are other possibilities of course, which you can figure out by playing around with the cards on your own. For instance a magic number of 14 is easy enough (King and 1, Queen and 2, etc.), but it’s also possible to make magic numbers of 11 and 12 while using the entire deck.
And there you have it: a simple yet effective means of automating sums up to 10, in English, mixed with a spoonful of fun, and…
Tell me a story!

Who is this man? Where is he? What is he doing? Who knows his story?
One of my favorite speaking activities is called “Tell me a story”. It’s simple enough, and allows every child the chance to speak for at least two or three minutes during the lesson. Here’s how it works:
- The children pair off, and each pair gets a picture. This particular picture comes from an Oxfam Novib calendar, which I use because I enjoy exposing children to images from other cultures during my lessons.
- The children then spend about five minutes brainstorming a story. I tell them, that only they know the entire story, including the stuff that’s not in the picture. That’s an important piece of information, because it allows them to use their imagination to fill in the blanks. In the case of the man above, we could say he’s listening to the radio with his camel friends, or we could enrich the story with tales of how that thing is really a camel-language-translator and how he and his camels talk with each other by having everything translated.
- The children practice telling their story to each other, making sure they have all of the words and phrases they need.
- Now for the mix-n-match part: of each pair of students, one of them becomes the story-teller, and the other one becomes the story-getter. The story-getters all stand up, and find themselves a new story-teller.
- The story-tellers tell the story they practiced with their buddy. They story-getterlistens carefully, asking questions when needed, and repeats the story back to the story-teller.
- Time for unmix-and-rematch: The story-getter takes the picture and the story back to the original buddy.
- The story-getter now becomes the story-teller, as he/she relates the new story to his/her buddy.
If you like, you can have the children repeat this process of story-telling and story-getting a few times, but I find that one round is usually enough.
To simplify the activity, you might use only one picture or poster for the class, and then start the activity by brainstorming as a class for various words and phrases that the children can use. You can also simplify the activity by shortening the story: instead of a full minute, each child has to make up only two or three sentences about the picture. You can also select a picture that is more familiar and therefore a bit easier, content-wise.
The process of mix-n-match may sound complicated, but, in all the times I’ve done this activity, it’s usually the adults who have more difficulty with the buddy exchange. Children usually have no difficulty with it. For us as teachers, it’s important to realise that even if they don’t get back to their original buddy, the point of the whole thing is to have all children speaking with each other for at least two or three minutes in the target language, using their imaginations to create stories all their own. If they manage that, then the activity was a success.
Broadening the ESLexperience – as easy as 1-2-3!

“Okay guys, it’s time to make a graph. You all have your blocks ready?” I ask. The children hold their blocks up. On the table in front of me, I have six circles, each a different color. One by one, the children come forward.
“My favorite color is blue,” says one, placing the block on the blue circle.
“I like blue, too,” says the next, placing his block on top of the other. Eventually, there are six piles of blocks, one on each color. Time for the maths lesson. We move the piles around, in order from highest to shortest, and find out which colors have equally many blocks. We count how many blocks there are piled up on each color, and before carrying on to concepts like more than, less than, the most, and the least. Which color do we like most of all? Which colors do we like more than yellow? Which colors do we like less than blue? The children look, think, and discuss their answers with the neighbors before raising their hands and giving their answers.
We use this simple block graph more often: favorite fruit, clothes we wear, pets at home, and so on. Sometimes, we make them out of duplo or legos, and leave our bar graph on the topic table next to the door so the parents can join in the fun.
Graphs are one easy way of incorporating other subject areas into the English lesson. Sometimes, the children would fill in their own graphs, based on the results of a walk and talk activity.

Older children can go even deeper into the material, for instance first building paper airplanes, and then seeing how far each one flies. Questions like “which one flew farther/farthest?” And “how far did it fly?” are simple examples of scientific inquiry. A line graph describing the results can be used to spark discussion and children can be encouraged to experiment with their paper planes to see how they can get even better results – all in the name of science, of course! But also in the name of fun.

And that’s the important thing – have fun, while broadening the ESL experience. If you have fun, the kids will have fun. And when folks have fun, that’s when they learn best.
ESL and musical intelligence: A chant a day keeps the blues away!

Try saying this a few times:
When you speak English, you speak with a rhythm.
WHEN you speak ENglish, you SPEAK with a RHYthm.
Did you hear it? Did you hear how the accents lined up so nicely? Those accents are part of what makes English easier to understand. Those accents also help the listener decide what words are really important: the accented words give the sentence its meaning, while the other words give the sentence its structure. It’s such a simple thing, but it makes the classroom teacher easier to understand when giving simple classroom commands such as “Open your BOOKS,” and “PICK up your PENcils.” What are the important words? Open, books, pick, and pencils.
The learner learns to use this accented structure when speaking, and will often copy this structure when giving commands such as “Open books,” or “Pick pencils”. The extra words “your” and “as” are added as the learner increases in fluency.
Besides increasing understandability in English, however, this innate rhythm can be used to increase learner fluency with longer passages of speaking. For instance, by embedding the language to be learned in a chant, learners can practice using the new words in longer passages without worrying about correctness. One woman, musician-teacher Carolyn Graham, realized that the natural rhythm found the English language could be used to help learners practice certain natural structures commonly found in daily conversation. She subsequently wrote several volumes of “Jazz Chants” which are used in ESL/EFL classrooms around the world today. Below is an example of one of her chants, called “John Brown”.
When using these chants in my own classroom, I make sure the children have a written copy of the words in front of them. This way, they can read along quietly, while I read the chant aloud. Next, they read along with me, giving the children time to process all of the information: what are they seeing, what are they saying, what are they hearing, and how does what they say match what the teacher says. Processing this information takes time, so we always start slowly. After one or two choral read-throughs, it’s time to mix up the game. I break the chant up into smaller chunks, and the class into equally many “chunks”. The children read along quietly, and when it’s their turn, they get to show off how well they can read along with the chant. For a few turns, different groups get different parts of the chant to read aloud. By the third time we read the chant, everyone knows exactly how to read it aloud and the chant sounds perfect.
Incidentally, I almost never have a child read aloud on his own because this really puts the child on the spot: every mistake he makes is heard by everyone. During choral reading, this effect is negated because the voices are heard in a group. Errors can still be heard, but since no one knows who made a particular mistake, the children are less likely to be self-conscious about reading aloud.
Carolyn Graham’s Jazz Chants are a very structured way of offering speaking practice during the English lesson. There is another, less structured way of practicing simple structures in the English language: embed the language to be learned in a simple call-and-answer mini-dialogue.
Here’s how it works: let’s assume the children are learning to talk about their daily chores. Words that might be learned are “washing the dishes”, “walking the dog”, “sweeping the floor”, or “making the bed”. I find pictures on the internet that match each of these meanings, and put them either on flashcards or on a single slide of a power point. Next, we study a simple call-and-answer mini-dialogue. For instance:
“What is he doing?” “He’s walking the dog.”
“What is he doing?” “He’s sweeping the floor.”
“What is he doing?” “He’s making the bed,” etcetera, etcetera.
During the “chant” itself, I ask my question and point to one of the pictures. The children respond with the correct answer. Because of the call-and-answer structure, the children are forced to think quickly about their answers. Again, because the entire group is participating, learner errors are only noted by the speakers themselves, and not by the entire class. The children receive instant feedback on their answers in the form of mental notes to self: Yes! I got it! or Oops, try again. Of course, I start slowly, and speed up as I note their improvement. Also, when I note that a certain word or phrase is causing difficulty, we can return to it as often as we need, until the entire class can use that particular word or phrase without hesitation.
This flexible structure can be used with many different kinds of words, with any age group. Here are a few examples of some mini-dialogues:
(color) “What color is this?” “It’s red.” “What color is this?” “It’s blue.”
(weather) “How’s the weather?” “It’s rainy.” “How’s the weather?” “It’s sunny.”
(animals and climate) “What do you see?” “A lion.” “Where does it live?” “The savanna.” “What do you see?” “A monkey.” “Where does it live?” “The jungle.”
Of course, it’s important to make sure that the words you use will fit, rhythmically, into the mini-dialogue. This can be a bit tricky at first, but with a bit of practice, you can build these flexible call-and-answer games into any one of your own lessons. Who knows, maybe some of your own learners can create chants of their own to share with the class!
I’m curious to hear if anyone else uses chants in their own lessons. If you do, please feel free to share your experiences!
Note: one site that has many free downloadable power points, flashcards, and handouts is www.mes-english.com. I often use the materials from this site to support my own lessons. It’s worth checking out!
SORTING IT OUT: LOGICAL-MATHEMATICAL INTELLIGENCE IN ESL

Once in a while, I’d start my preschool ESL lesson with two hoops and a box of attribute shapes. I’d roll out a carpet in the middle of the circle, motioning that there was no talking allowed. In complete silence, I placed the hoops on the carpet, side by side, like this: 
Then, I’d take a red shape from the attribute box, hold it up, then place it in a hoop. I’d take a blue shape from the box, and place it in the other hoop. A red shape, then a blue shape. The pattern was established. Then, I’d motion for children to point to the correct hoop. Which one this time? The blue hoop? or the red hoop? Then I’d pick up a yellow shape. Where did this go? I’d offer the shape to a child, so he could figure out where it belonged. By now, I’d hear quiet whispers of “no, not red,” and “no, not blue,” telling me the children understood the yellow shape needed to go elsewhere. But where? I’d motion to a place outside of the hoops, and the children would nod excitedly. Yes, that was just the place for the yellow shape.

We’d go through this a few times, using shapes, then size, until the children had this puzzle down pat. Time to take the next step: mixing two different sets of attributes.
In the one hoop, I’d place a blue circle. In the other, a red square. Then, a blue triangle in the first, and a yellow square in the other. The children were catching on, pointing first at the “blue” hoop for blue shapes, then at the “square” hoop for the square shapes, correctly. Then came the blue square. Where would this fit best? How to solve this problem? I would wait. Child after child would try to solve it, putting the blue square by the blue shapes, then by the square, then outside both hoops. Eventually, some child would balance the blue square on the edges of both hoops. I would assent, moving the hoops so that they overlapped. An audible sigh of relief invariably escaped as the children realized that this impossible puzzle did, indeed, have a solution.

After that, we would play the game one more time, to see if they really did understand the concept of the Venn diagram. During the exercise, I would introduce simple words like big, small, triangle, circle, rectangle, square, red, blue, and yellow. The group quietly practiced saying each of these words several times, so they could say “yes, a circle” and “no, not a circle” when explaining their rationale about why a shape belonged in a certain place.
This exercise is a simple, abstract way of introducing the concepts of comparing and contrasting two different objects. Later, this exercise can be applied in a more verbal form, for instance when comparing and contrasting two people, different animals, or different foods, during an ESL lesson. The possiblities are endless!
This exercise is an excellent way of increasing vocabulary of descriptors, at any level of working. I’ve used this myself at all sorts of levels, and hope you enjoy using this as well.

Co-operative learning activities in ESL
 Did you know that in many English lessons, the children get less than a minute of speaking time? That is, if they get any time to speak at all during the lesson. And yet, isn’t learning to communicate with others what ESL is all about?
It’s important to find ways to allow every child to speak during each and every ESL lesson, at his own level, in a safe environment. How, might one ask, can we allow time for speaking practice without eating up valuable lesson time? One of those ways is called the inside-outside circle, which is a more structured variant of what I call the walk-n-talk. Here’s how it works:
Preparation: teach the children the target language and classically practice using it. Decide on a language task for the children to practice. When desired, you can pre-teach certain terms or write them on the board to support the children’s use of the target language.
Step one: the children form two circles, each inside the other. Make sure there are equally many children in the inside and the outside circle. (in case of an odd number, pair off two children in the outside circle as “one” child. They will form part of a threesome during the exercise)
 Step two: give the children a speaking assignment. They get a few seconds to think about what they will say, and then get started. Tell the children who starts – the inside or the outside circle.
Step three: time the conversations. I find that keeping them short is an effective way to keep the conversations focused. Give a signal when it’s time to take turns. I find that 30 to 45 seconds is generally enough per turn.
Step four: Switch speaking partners, and have the children repeat the speaking assignment. It works best if you give directions such as “the inside circle moves two people clockwise / to the right.”
Repeat steps three and four again, so that the children have had three chances to practice the speaking assignment.
This activity can be easily differentiated to meet various needs and abilities. Here are a few examples of language tasks that would work nicely:
- what colors are you wearing? What colors is your buddy wearing?
- What body parts can you point to and name?
- Talk about your family.
- Describe your house.
- What will the weather be like next week?
- Take turns remembering words about (given topic). How many can you remember?
- What did you do last week?
- What do you want to be when you grow up?
Clearly, this list is not exhaustive, but it gives an indication of how broadly one can implement this exercise. Another way to differentiate is to allow more or less time for each turn.
In my experience, the first time I did this activity with any class, the first round was quite noisy. This was mostly because the children were trying to figure out what it was they were supposed to be doing. After each round, I gave them concrete feedback on what I heard them saying, and after the second attempt, everything went quite smoothly.
I have also found that giving children this type of task allows them to practice their language skills without being put on the spot. After all, there is only one other person listening, and that person gives immediate feedback by providing extra words or asking questions when something is unclear. Even the shyest of children join in gladly when it’s time for inside-outside circle. Another side effect is that the children get the opportunity to perfect their stories within three tries, giving each child a successful experience, while taking up little lesson time.
 I wonder what co-operative learning strategies others have used in their ESL lessons? Please send me a note and let me know!
More than just a pretty tune: musical intelligence and ESL
Buddy you’re a boy, make a big noise
Playin’ in the street gonna be a big man some day!
You got mud on yo’ face, big disgrace,

There may be a few people out there who do not know this song, but I suspect that many people will recognize the stomp-stomp-clap pattern when the audience sings along with the band, Queen.
Inside each and every one of us is a musically intelligent being. Some discover their inner musician whilst under the shower, others whilst listening to their favorite singer. My husband, for instance, cannot hold a tune to save his life, but has a song reference for everything he does and sees. I can throw any random word at him, and he has a song to match. When I don’t believe him, he looks it up on Youtube, and proves it actually exists, along with a cover song or two. That’s a game he wins every time.
The question for us, of course, is how to apply this knowledge to teaching ESL? No doubt enough teachers out there already know a load of children’s songs, singing them daily to help teach new vocabulary and reinforce already learned concepts. But what about the rhythms of the language? I decided to play around with my ESL preschoolers and came up with a fun idea.
I started with flashcards. For instance, if teaching words the children might need during their summer holiday, I would teach words like sand, bucket, shovel, boat, fish, and sun. I would take three flashcards, then hold them up, one at a time. The children would say the words as they saw them. It never took long before the children found the pattern: sun, boat, fish, sun, boat, fish, sun, boat, fish….
The children would then get the assignment to make their own patterns. Preparation for this activity was simple enough. First, I looked up pictures using Google image seeker and saved them to my computer. (tip: use “image settings” on Google to get line drawings. These are easier to use.) Second, I pasted a number of each picture onto a sheet of paper, in random order. It’s important that the children be able to cut around the pictures, so I left a bit of space in between.

Third, I made a number of long, thin strips of paper, one for each child. These were usually around 50 cm (about 20 in) in length, but longer was also fine.
The children then got to work. Each child decided what words he wanted to use, and then cut out a number of these words. As a minimum, the preschoolers had to use two different words, and the kindergarteners at least three. After that, he lined up his pictures to make a pattern. For some, this was a more difficult task than for others. Only after the child created a pattern did he get a strip of paper. He then stuck the pictures onto the strip of paper, and then read his pattern out loud. Voila! A chant!

It was always fun to see what kinds of patterns the children made up. I found that they also enjoyed “reading” their patterns out loud to their classmates, and these patterns made excellent material to keep in the children’s language portfolios.
Multiple Intelligences and ESL lesson planning

Once upon a time, long, long ago, I was given an article to read by my art teacher. It had been written by a man named Howard Gardner. It was a difficult read, including all sorts of concepts I’d never heard of before: logical-mathematical intelligence, visual-spatial intelligence, and other such concepts. After a few reads, I had an idea of what Mr. Gardner meant, and was ready to present the article to the rest of the class. Back then, only seven intelligences had been identified. Nowadays, there are nine. I won’t go into detail about this theory here, but will encourage interested readers to look it up on wikipedia (https://en.wikipedia.org/wiki/Theory_of_multiple_intelligences).
Gardner’s theory interested me greatly, so you can only imagine how pleased I was years later when I found out that the Dalton school I worked at also wished to apply this theory in its own teaching practice. So off I went, figuring out how to include multiply intelligent activities in my own ESL lessons.

I plan my lessons a theme at a time. That way, the lessons build up in a logical fashion to a certain objective. I start by picking objectives from my semi-annual planning. Then I grab the objectives provided by the textbook I’m using, if that’s what I’m using. After that, it’s time to dream. The sky’s the limit. What kinds of fun games can we do, while learning to speak, read, write and understand English? This is where the multiple intelligences come in. What can we do to stimulate children’s learning while activating their various intelligences?
Of course, it’s easy enough to fill in the Musical intelligence. Songs, songs, and more songs… but also, rhythm! English is a language full of rhythm, and it would be a shame not to put that to proper use every chance we get. Clapping the words, stomping them out, until the children literally feel the words coming through their mouths.
Bodily-kinesthetic intelligence is also pretty easily filled in. Charades, TPR exercises, and role plays are basic means of activating this intelligence. I also employ sign language every so often, and children remember the words combined with the motions, placing their new vocabulary inside their bodies.
What could we do with our logical-mathematical intelligences? Putting story cards in order, sorting words per theme, and “odd one out” topped my list most times. We also made a flowchart describing animals and played a quiet game with hoops in the form of a Venn Diagram whenever I needed a lesson that started with some quiet.
The naturalist intelligence was a bit more difficult for me. I often made do by connecting the theme-related words to weather, climate or culture. It wasn’t perfect, but I comforted myself with the idea that as long as we activated most of the intelligences, we were helping every child learn via his or her various intelligences.
Interpersonal intelligence was often filled in with role plays, while intra-personal intelligence led to journal pages, family portraits, and presentations about ourselves.
We often drew pictures in our project notebooks, activating the children’s visual-spatial intelligence, or used posters, played memory games, drew mind maps, and used flashcards to activate their visual memories.
The linguistic intelligence was easiest of all, it seemed, as foreign language instruction was really all about language. Even here, though, I made certain to put in special language-based activities: telling jokes and simple puns, making crossword puzzles for the older children, reading stories and poems to the younger ones.
I never worked with the existentialist intelligence, having only learned of its existence after I stopped working with young children. A pity, perhaps, but also a space to be developed by other ESL teachers around the world, I hope.
As time went by, I ended up developing, finding, and implementing a wide array of tools to get children learning English in ways that worked best for them. Over a decade later, I look at a cupboard full of good stuff, in the hope I can share it once again.
Experimenting with the linguistic experience:
the language lab
Within the first few years at my school (and that was a few years ag), I was required to earn the Dalton teachers certification. The course itself took two years, and was given in modules covering the various aspects of Dalton education, including multiple intelligences, freedom within bounds, co-operative learning, and responsibility.
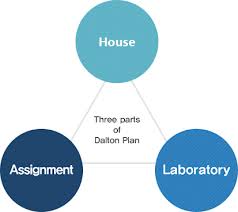
I took a lot away from those courses, and while developing my own research questions and portfolio, stumbled upon the concept of “learning lab”. According to the dalton plan, each dalton school has three parts: a house (a classroom), an assignment, and a laboratory, where children can experiment as part of their learning process. I decided that I would build a laboratory where children could experiment with language, with various assignments as a basis for their work.
It took some experimentation, but after a year or two, I ended up with a fairly satisfactory design which I use to this day. The language lab – or “English Corner”, as the children call it – consists of three main stations: language practice with the teacher, independent small-group work, and paired work on the computer.
Language practice with the teacher

This station usually consists of a simple game or activity in which I work with a small group of children. During the course of the activity, each child has the opportunity to develop his language skills intensively, practicing the words and grammar structures we’ve been learning in the whole-group lessons. Because this activity is so teacher-intense, the other activities are designed for independent and paired work.
Examples of work I might do with the children at this station are varied, depending on the age level of the children and what skills I think they need to learn. At the start of the year, for instance, I will spend a few sessions teaching the children games that they may play independently later in the year. I might also use this time to build a paper-mache story-scape on my table, play with hand puppets, or do simple assessments.
Independent practice with classmates

This portion of the lab features activities that are related to the topic being taught in the whole-group lessons. For instance, if we are learning vocabulary for the house, there will be a dollhouse, replete with dolls and furniture. During the instruction, I remind children of the words we have been practicing, and that I expect to hear these words being used as they play together. I also remind them of the co-operative learning skills I expect to observe (albeit from a distance). In the course of their play, I listen for the expected vocabulary and give compliments when they use the vocabulary.
When children use Dutch (L1) instead of English in this activity, I don’t worry about it. The objective of this activity is that children use the target vocabulary, thus reinforcing the concepts taught, no matter what the language.
Co-operative work on computers

Here, the children work in pairs on computer games. The games are varied, and the children may choose which (educational) English game they will play – Teddy’s Train and Tilly’s Word Fun are favorite among the very young, while the older children will often work on Oscar’s Word Bank, online reading assignments, or other internet-based assignments.
The computers are equipped with splitters, so that two headsets can be used per computer. There is a very good reason for this: at a Dalton school, children need to learn to work together. By pairing them off on the computer, children need to use basic sharing skills such as taking turns with the mouse and in choosing the activity. They also help each other out, teaching their computer buddy how to navigate a new game or assignment. A side effect of this method is that as there are only a few computers in the lab, more children get to use them at the same time.
Other activities:

It’s important to have other activities that children can do entirely on their own, such as reading, or listening to a recorded book or song.
Keeping track:
Of course, it’s important to insure the children have a well-rounded experience in the language lab. If, for instance, the same children are always working on the independent activity, they will never work with me on the more language-intensive activity, something that allows for greater development of their skills. I’ve experimented with several ways of recording the children’s choices, so that they could choose something else during the next session. Here you see my first attempt at helping children keep track of their choices:

I was unhappy with the double-bookkeeping this required, and the children had no overview of their own past activities. I wanted a choice board that gave the children insight into their choices: what had they chosen in the past and what their future possibilities were. I found magnetic boards for sale at a local shop, and with some sticky-back plastic, magnetic tape, and laminated name and number cards, put together this design:

However, even this model had its drawbacks: I had no place to record how children had done with the given tasks, and as each class had its own board, I had to maintain a number of these boards in a rather small space. Occasionally, the boards fell down and all of the magnets fell off, so that the information was lost. I needed a better solution.
In the end, I settled for a paper version of the magnetic board. This paper version is simply a checklist with the children’s names in large letters, and pictograms representing the various activities. The children can see this checklist as they make their choices, and I mark their choices on the sheet. This compacts the space requirement and allows me a place to make notes of children’s language behaviors. This is the model I work with today, and I’m quite happy with it.
Organization of the language lab:
I work with groups of 12 to 18 children per session. We start all together, and I briefly explain what activities are available for the children to choose from. The children take turns choosing their activities, and realize that “full is full”. If I only have four spaces for the ever-popular computer station, and four children have chosen that activity, I list the activities again, reminding the children that the computers are now full. Once the children’s choices have been made, the children go to their stations and get to work. At the end of the language lab session (usually about 20 to 25 minutes later), I sing the tidy-up song, the children put everything back in order, and line up to go back to class.
While I work with half of the class in the language lab, the classroom teacher works intensively with the other half, giving small-group instruction. Then we switch groups – the group that was in the language lab then receives small-group instruction, while the other group works in the language lab. This manner of working requires the teacher to keep a close eye on the clock while teaching, but in general has worked out quite satisfactorily for all involved.
I wonder how other teachers solve the issue of getting children to practice their language skills outside of the regular lessons offered? Please let me know what you do about this.


You have brought up a very good details , appreciate it for the post.
LikeLiked by 1 person
Hi! This post could not be written any better! Reading through this post reminds me of my previous room mate! He always kept talking about this. I will forward this article to him. Fairly certain he will have a good read. Thanks for sharing!
LikeLike